(Beta) Multi-frame Video rendering for StableDiffusion
A downloadable tool
Note:
- This is a Script for the Automatic1111 UI of StableDiffusion
- I have tested it with non-face videos and it does very well, I just worked a lot with a specific video and it makes it easier to compare
- None of the animations shown have been edited outside of the script, other than combining the frames into gifs.
- They used public models with no embeddings, hypernetworks, lora, or anything else to further aid with consistency.
- No deflickering process was run on them, no interpolation, and no manual inpainting.
- This is beta and mostly a proof-of-concept at this point. There's a lot to work out since this is all so new, so it's nowhere near perfect. You can try to mitigate some issues by using custom art styles and embeddings, but it's still a ways off from being perfect.
Multi-frame Video Processing
This project is my attempt at maintaining consistency when animating using StableDiffusion.
It borrows from previous work I did in attempting to train a model for split-screen animations to generate 360 views of characters. With the advent of ControlNet I found that far more could be done by using the split-screen/film reel technique and so I'm trying to workout how to best utilize it.
How it works (basics):
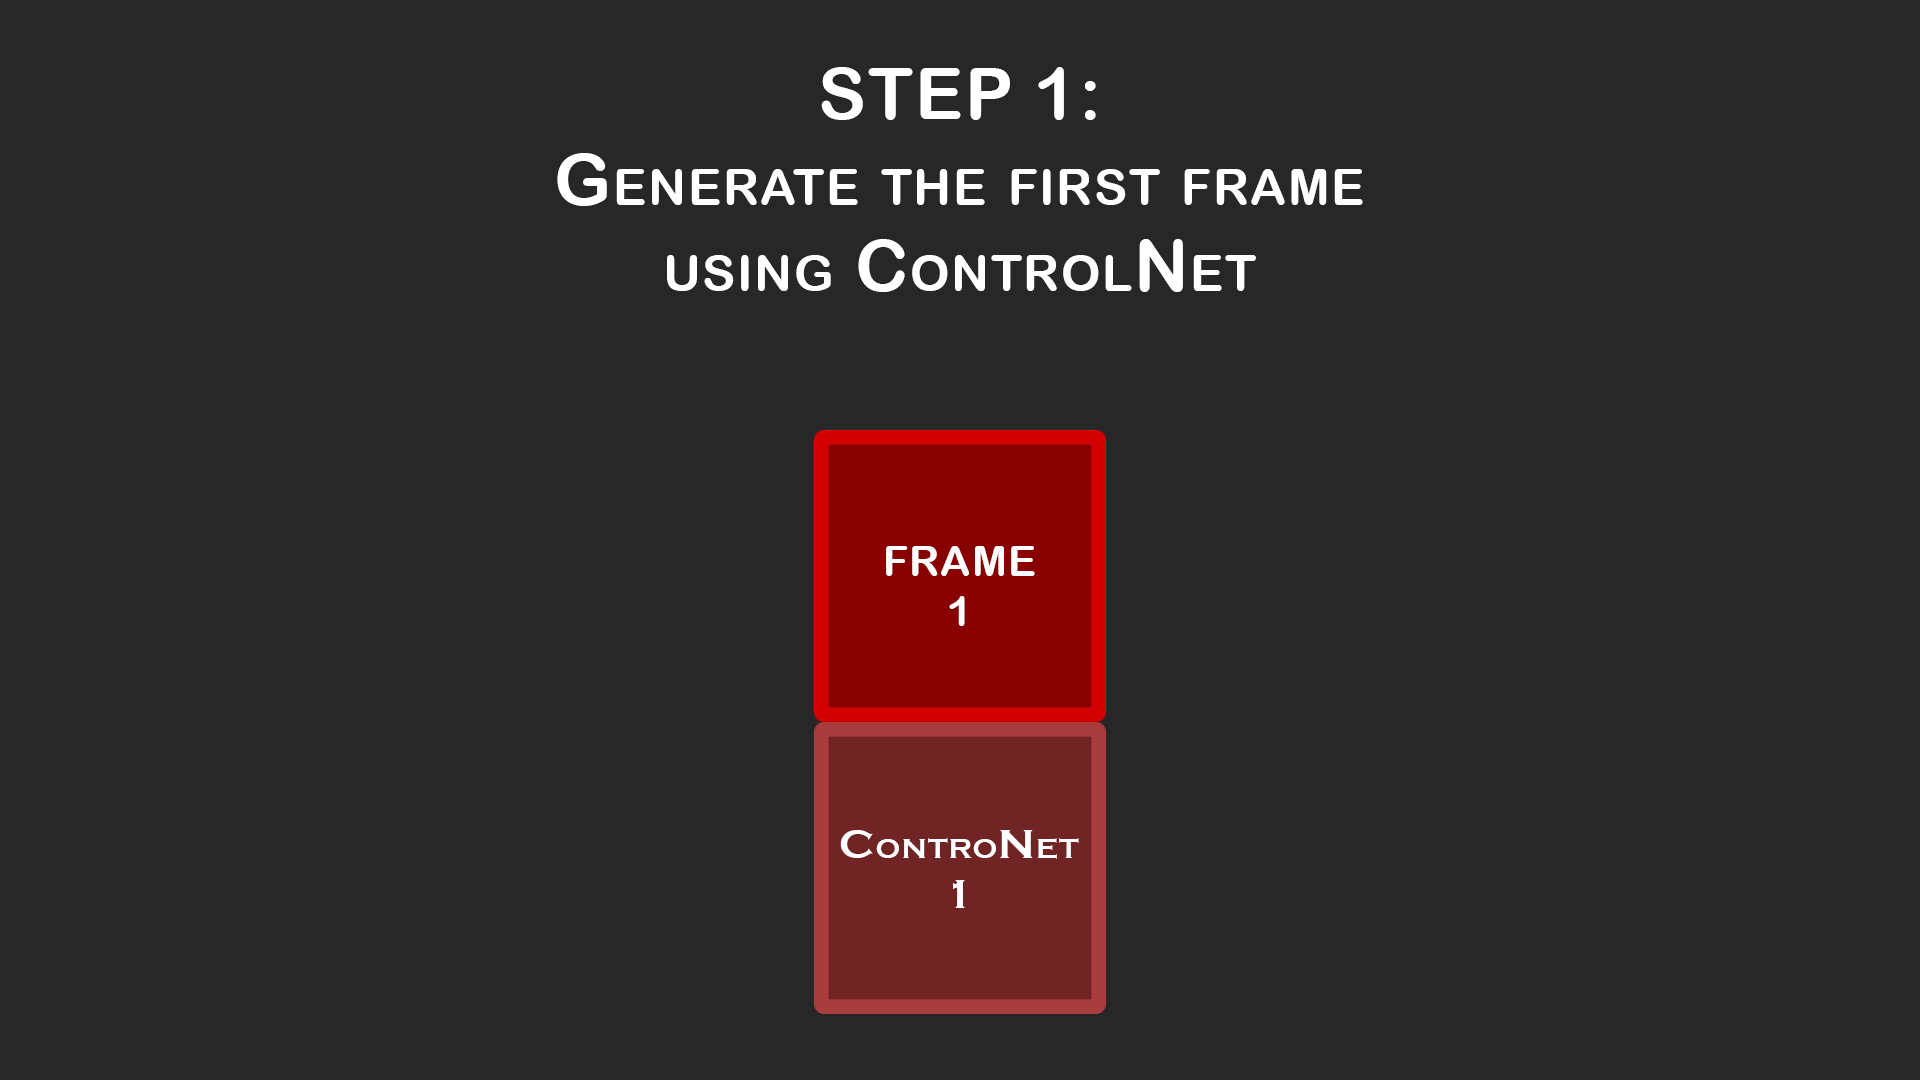
You can set denoising strength to 1 on here and just use ControlNet to guide it to whatever pose and composition you need for the first frame of your animation. Take your time to get a good result since this first frame will guide the rest of the animation.
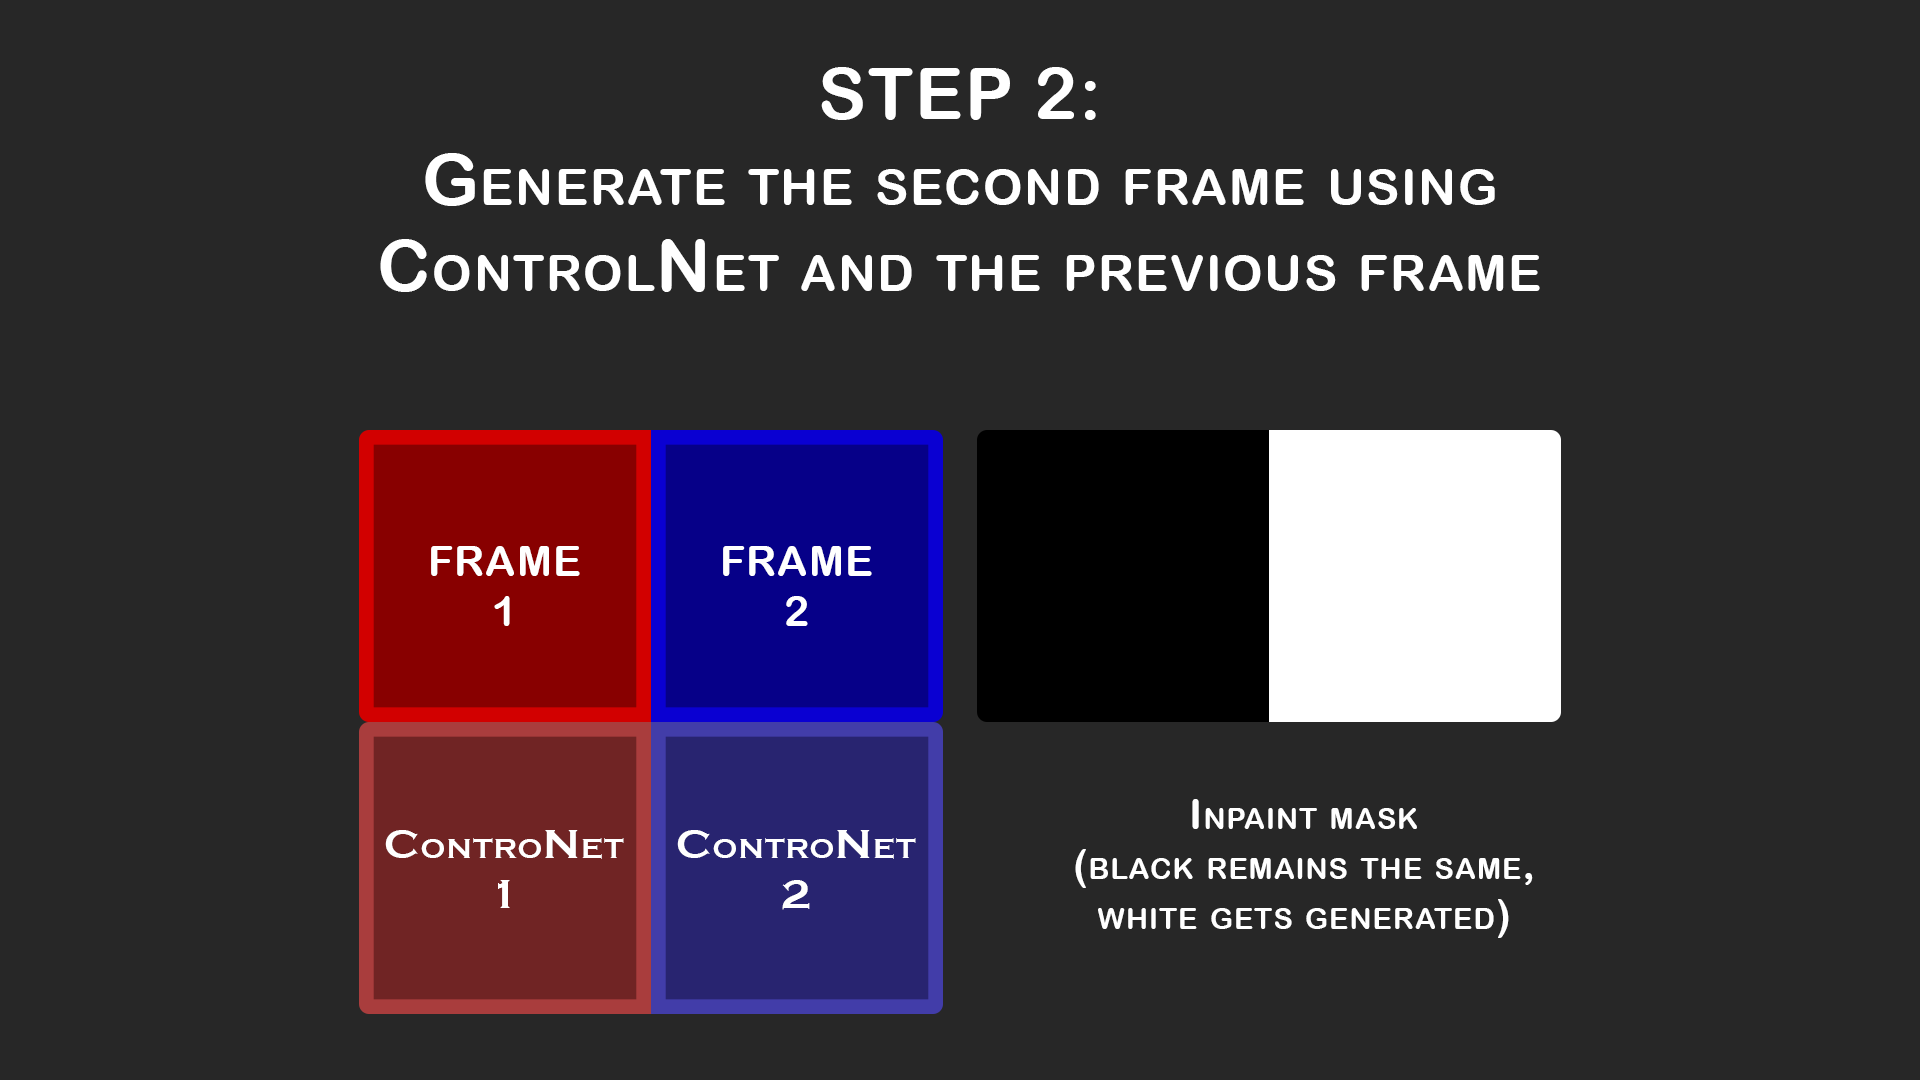
The Script automatically uses the first frame in order to create the second frame by creating a split-screen iput image, similar to a horizontal film reel. The previous frame becomes the base image for frame 2 before the img2img process is run (aka loopback).
Note that almost every animation shown here has denoising strength set to 1.0 and so the loopback doesn't actually occur. Looping back with a strength of 0.75-0.8 does seem to make it a little more stable, but be sure to enable color correction if you have denoising below 1.0 otherwise there's color drift.
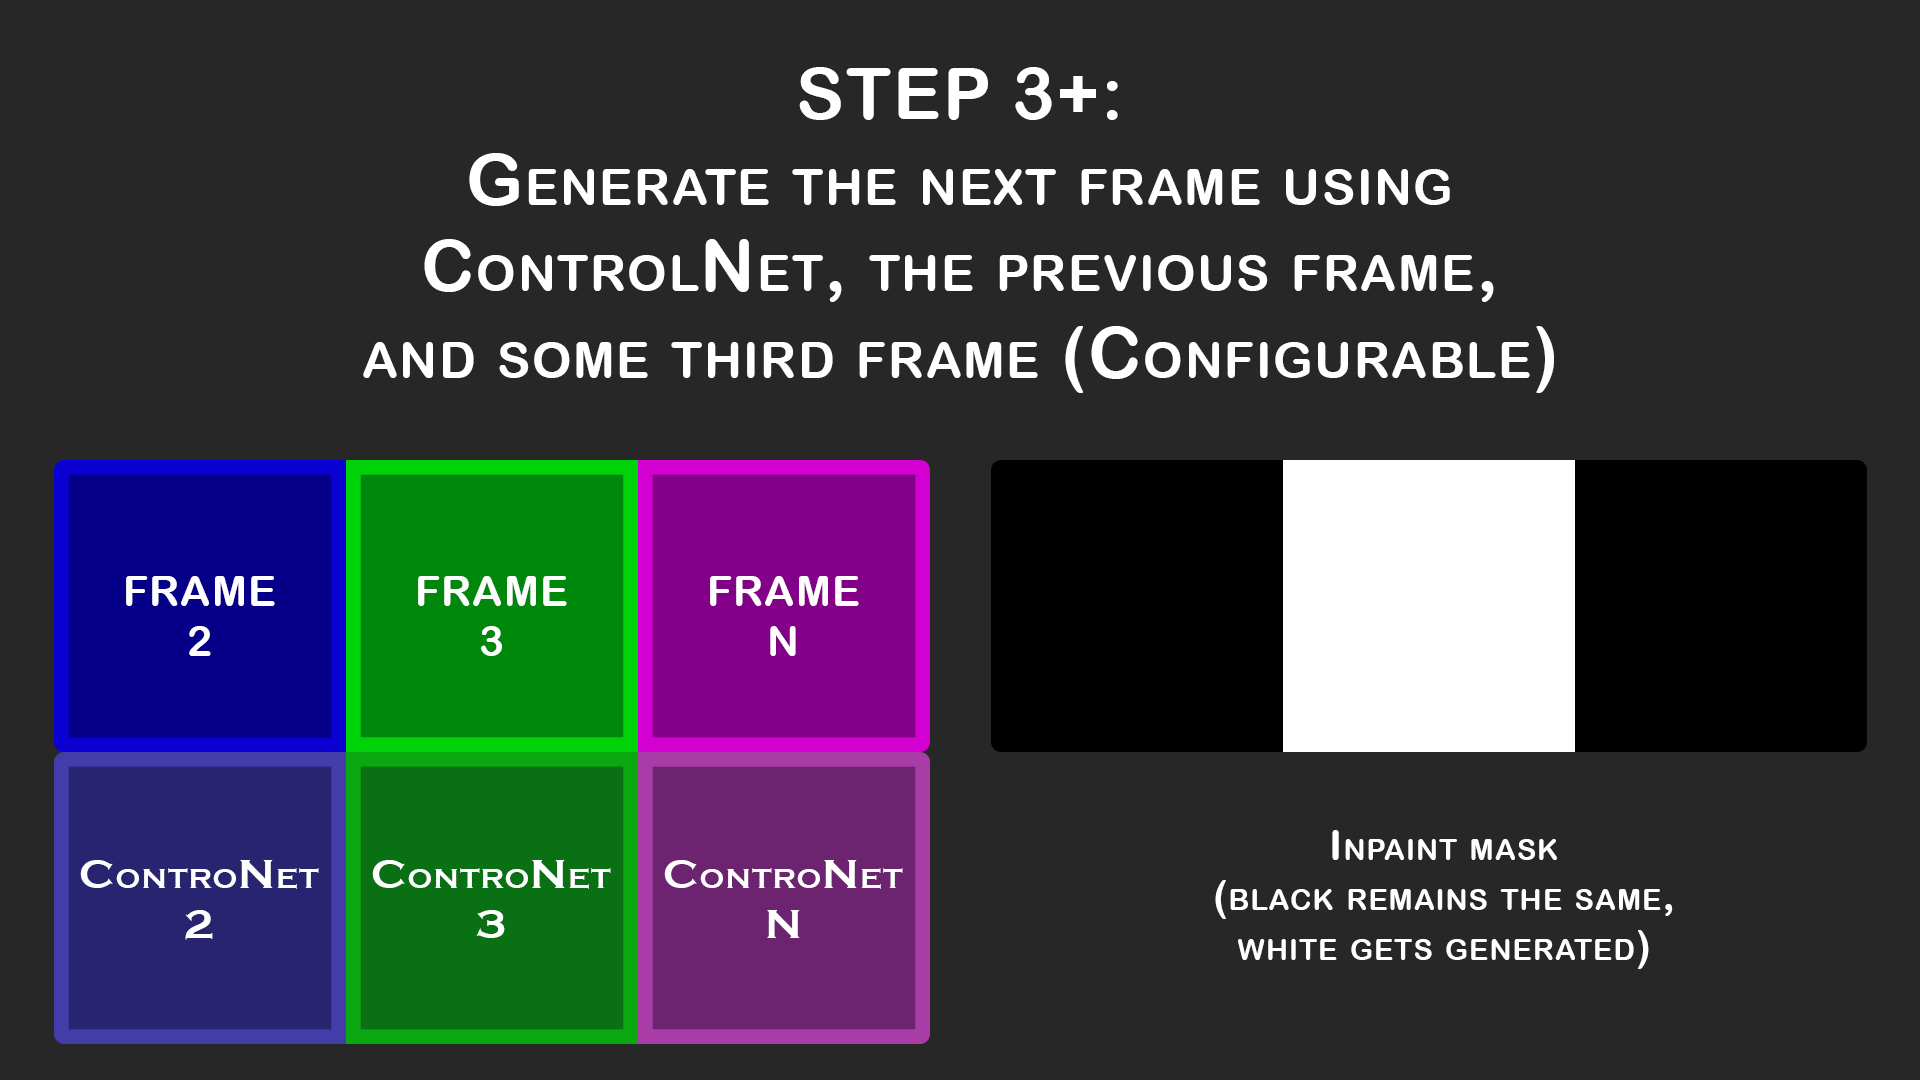
Similar to what happened to generate Frame 2, the remainder of the frames also use a horizontal film reel setup. It's setup the same as before except that we add another image onto the right side. Since we don't actually know what that frame will be, we instead place an existing frame in that spot in order to act as more guidance. I find that the best option for this is "FirstGen" which means the very first frame of the animation is always the last frame for these. It helps reduce color drifting although if the animation changes a lot and this isn't practical, then "Historical" is another great option since it uses one step further back (so in the example above it would be frame 2, then 3, then 1 when generating frame 3).
Installation:
Install the Script by placing it in your "stable-diffusion-webui\scripts\" folder
How to use it:
Step 1:
Choose your favourite model and find the right settings to convert the first frame of your animation into whatever style or character you want for the final animation.
Keep in mind that CFG Scale and ControlNet Weights seem to have the largest impact and are the main concern so I would find the right values using X/Y plot before generating a bunch of options for your first frame.
I usually set ControlNet weight from 0.3-0.7 depending on the animation. Higher values will make the quality worse but will make the animations better conform to the guiding frames.
Step 2:

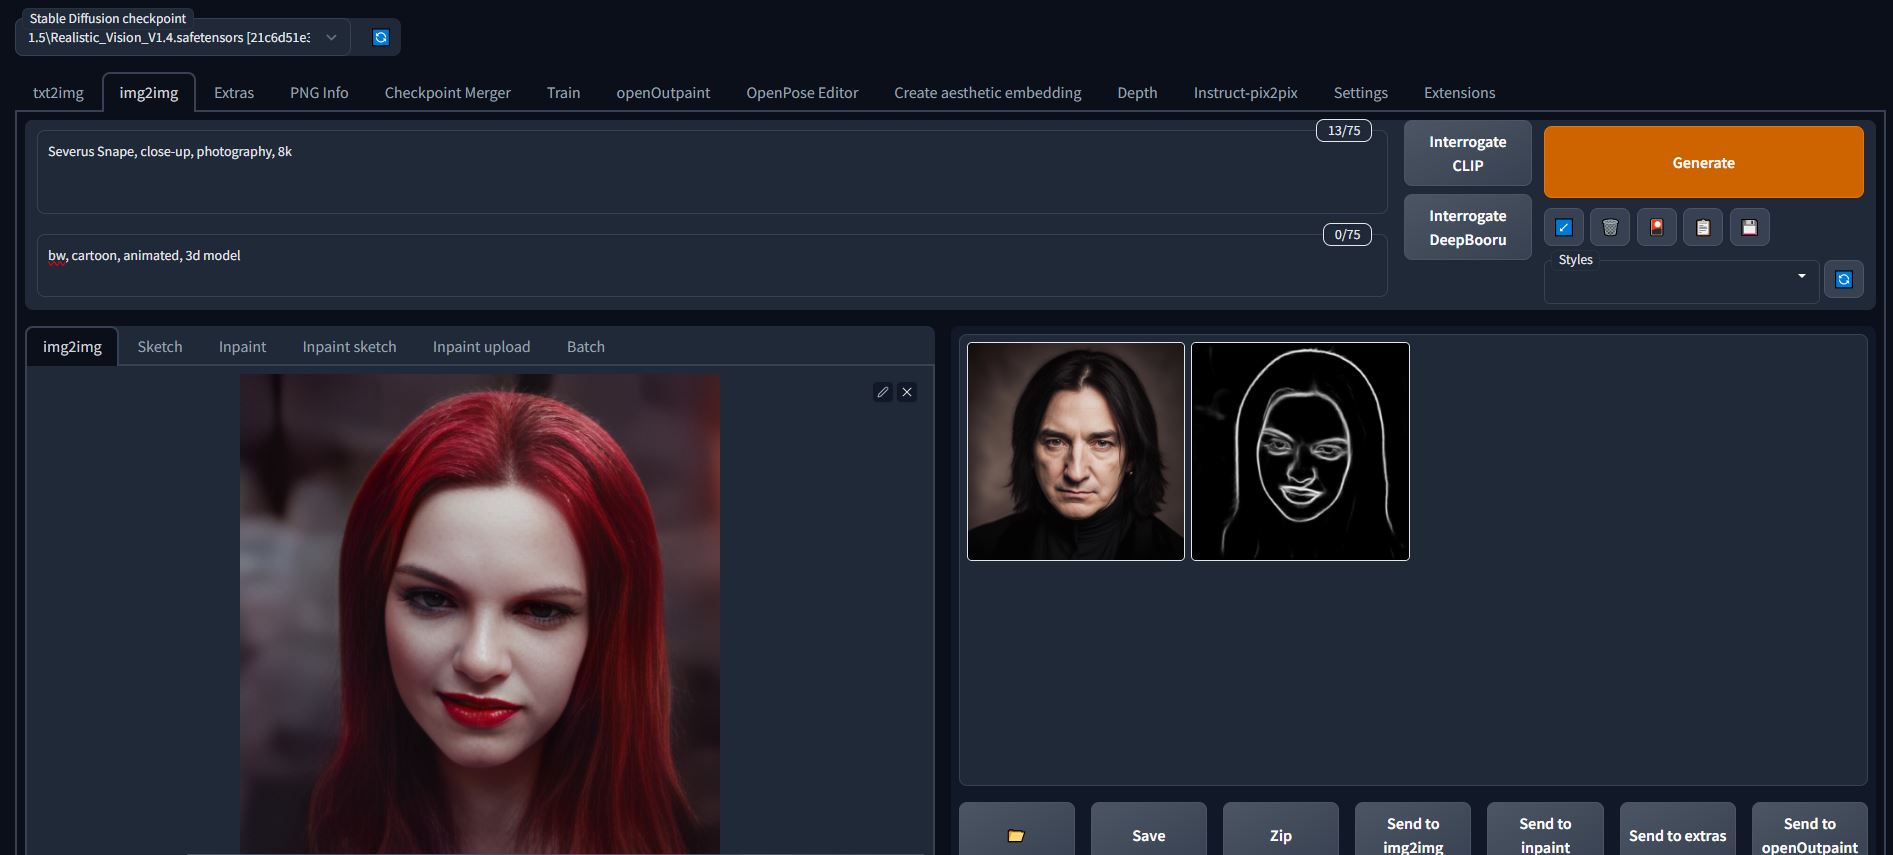
click the "send to img2img" button.
Then select the script from the menu
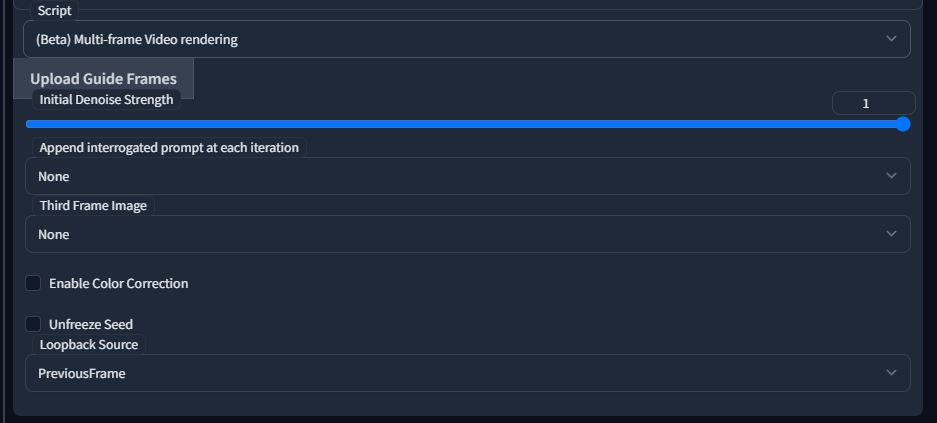
Step3: Choosing your settings
Here are the settings I chose for this example but the settings are explained down below
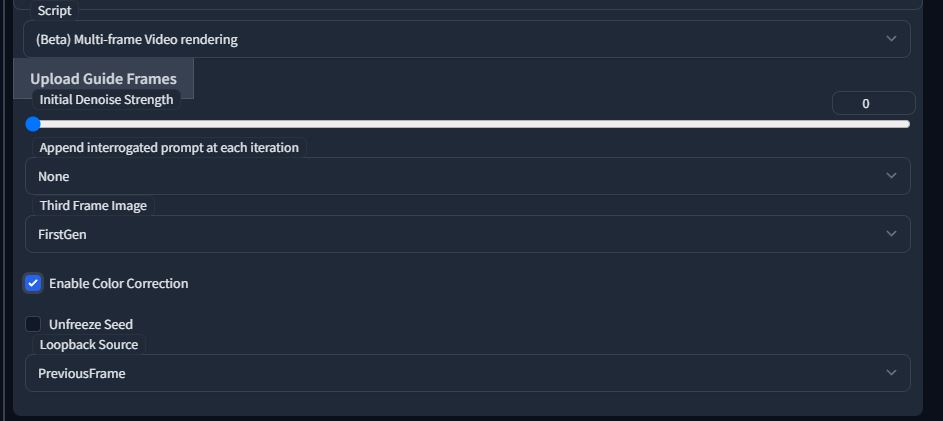
Be sure to click the "Upload Guide Frames" button and select your guide frames:
Initial Denoise Strength:
This value controls the denoise strength for the first frame of the animation. If you followed along and sent your previous img to img2img mode then you'll want to set this to 0 so that the image you had before is the first frame of the resulting animation.
If you set this to 1 and the seed to -1 then you'll get a different starting frame each time and so a different animation. You can do this with higher batch counts to get a bunch of distinct variations on the animation from the same prompt
Append interrogated prompt:
This is just a legacy option from the prebuilt loopback script that I built my code off of. I have never actually used it, but it should work and is the same as the loopback script implementation.
Third Frame Image:
This is the most important setting. It controls which image is used for the frame to the right of the image during generation. (refer to step 3 of the "How it works" section)
None:
- Only use 2 images (1 reference frame).
- Fastest method and least resource intensive.
- Often has color degradation issues. (Color Correction helps mitigate it)
FirstGen:
- It places the first frame of the animation as frame 3 for each generation.
- Generally the best option from my testing.
- It has the least color degradation issues of any other setting
- works better for small sections of an animation or ones where the first frame is a good reference for all the others.
Historical:
- When generating frame K, the third frame is frame (K-2) so for frame 9 it would be |_Frame8_|_frame9_|_frame7_|
- It reduces color degradation compared to "None" but not as much as "FirstGen"
- For animations that vary a lot from the initial frame in terms of content, it performs better than the other methods.
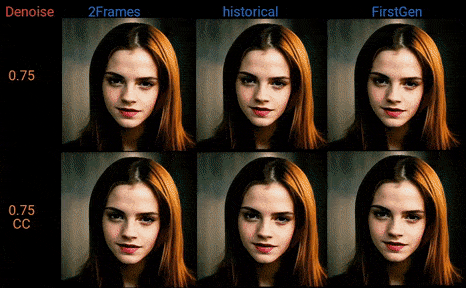
Color Correction:
Color correction tries to reduce the problems faced with color degradation, especially when doing loopback (denoise below 1.0).
Here's a comparison of Color Correction (CC) with 0.75 denoising strength animations and the various Third Frame settings:
Unfreeze Seed:
With the seed frozen, each frame generated will use the same seed. With it unfrozen the seed will be different for each frame. It tends to be a noticeably smoother with the seed frozen from my experience, but I believe it's also the cause of the weird effect where the textures or skin details seem to stay in place rather than moving with the person/object. This is mostly noticeable for close-up shots, but Seed Variation settings might be able to correct it. I haven't had a chance to fully test it.
Loopback Source:
Loopback Source is the image used for loopback process, i.e. the center (green) input image in Step3 of the "How it works" section. If denoising strength is set to 1, as it normally is, then this image is just impacting the color-correction setting.
Step 4: Running it
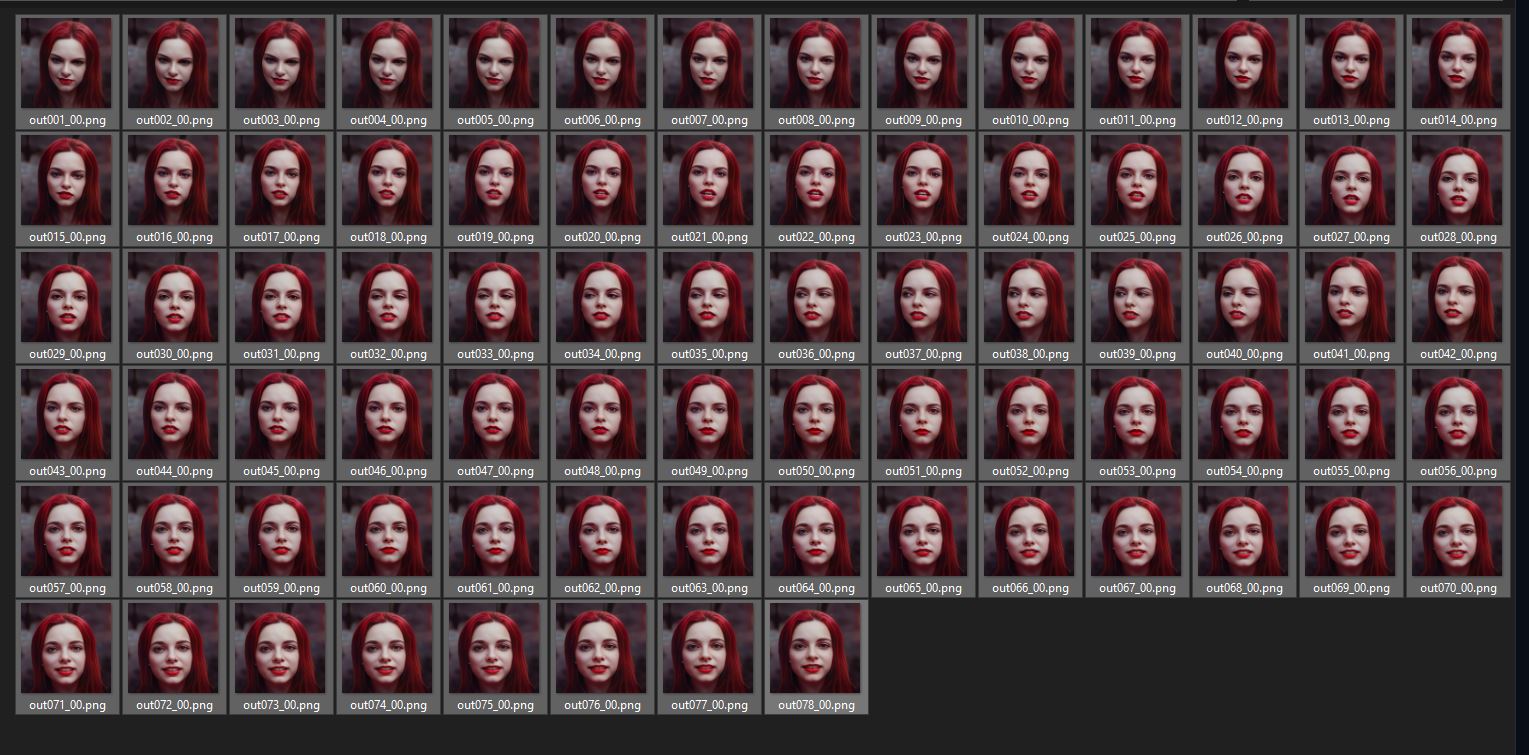
You can run it on the first few frames initially to see how it looks:

It should give you both a spritesheet of them along with each image individually.
If you are happy with the way it's going then select all the frames that you want it to process and let it run. This can take a while since it's processing up to 3 frames at once.
Once finished you'll have a sprite sheet and the frames for your video. To make the gifs I just uploaded the spritesheet to https://ezgif.com/sprite-cutter then it gave me a gif output like this:
If it's not conforming enough to your video then you may have to increase the ControlNet weight or change some other settings slightly. That was the case here so you can see the first generation:
then a version with the ControlNetWeight increased to 0.55:

and again at 0.7:

Last one at 0.9 and with "Loopback Source" set to "FirstGen" (for the way it interacts with Color Correction):

I think there's quite a few settings I would still change and ControlNet Weight went a little high, but I don't have the computing power to iterate quickly and each animation with these is 78 frames (12.5fps) at 512x512 pixels, which means 1536x512 with the script and that's about 15 mins per run.
There's a lot to figure out in terms of settings and training to fix various issues, but these are the basics and I hope that the community helps figure out the best practices.
This guide used RealisticVision 1.4 for the model but other models may perform better or worse, and using embeddings would help a lot in order to get better consistency, less color degradation, and an overall smoother video.
Known Issues:
Note: There's a lot to work out so this isn't a comprehensive list
- Color Degradation - This is a big one. It happens a lot with 2-frames mode especially. The color correction setting helps but there's still a lot to work out and this is definitely the largest problem in general. The reverse-noise thing that TheCorridorCrew mentioned is setup in a version of this script but it amplifies the color degradation a lot so I need a fix for that before I can try to implement that option.
Download
Click download now to get access to the following files:
Comments
Log in with itch.io to leave a comment.
How to write the request json when I call the img2img interface of the sd by Multi-frame rendering script, my original request json was as follows:
payload = {
"init_images": [image_base64],
# "prompt": prompt,
"prompt": prompts[i],
"negative_prompt": negative_prompt,
"styles": [],
"seed": 2694589603,
"subseed": -1,
"subseed_strength": 0,
"seed_resize_from_h": height,
"seed_resize_from_w": width,
"sampler_index": "Euler a",
"sampler_name": "Euler a",
"batch_size": 1,
"n_iter": 1,
"steps": 30,
"clip_skip": 1,
"cfg_scale": 8,
"width": width,
"height": height,
"restore_faces": True,
"tiling": False,
"do_not_save_samples": False,
"do_not_save_grid": False,
"eta": 0,
"denoising_strength": 0.4,
"s_min_uncond": 0,
"s_churn": 0,
"s_tmax": 0,
"s_tmin": 0,
"s_noise": 0,
#"override_settings": {
# "sd_model_checkpoint": "chosenMix_chosenMix.ckpt [dd0aacadb6]",
# "sd_vae": "pastel-waifu-diffusion.vae.pt"
#},
"override_settings_restore_afterwards": True,
"refiner_checkpoint": "",
"refiner_switch_at": 0,
"disable_extra_networks": False,
"comments": {},
"resize_mode": 0,
"image_cfg_scale": 1.5,
"mask": None,
"mask_blur_x": 4,
"mask_blur_y": 4,
"mask_blur": 0,
"inpainting_fill": 0,
"inpaint_full_res": True,
"inpaint_full_res_padding": 1,
"inpainting_mask_invert": 1,
"initial_noise_multiplier": 1.0,
"latent_mask": None,
"include_init_images": False,
"script_name": "",
"script_args": [],
"send_images": True,
"save_images": False,
"alwayson_scripts": {
"ControlNet": {
"args": [
{
"input_image": image_base64,
"enabled": True,
"lowvram": False,
"pixel_perfect": True,
"mask": None,
"module": "canny",
"model": "control_canny-fp16 [e3fe7712]",
"weight": 2,
"guidance_start": 0,
"guidance_end": 1,
"threshold_a": 100,
"threshold_b": 200,
"control_mode": 2,
"resize_mode": 1,
"processor_res": width
}
]
},
"face editor ex": {
"args": [
{
"prompt_for_face": "best quality, highly detailed, extremely detailed, shiny skin, shiny clothes, perfect face, beautiful face, white face, anime, cute, manga, green eyes, red lips",
"affected_areas": ["Face", "Hair"],
"use_minimal_area": True,
"save_original_image": True,
"face_size": width,
"upscaler": "R-ESRGAN 4x+"
}
]
}
}
}
Struggling similarly to others, while it seems to be batch outputting photos, it's really just a slight redrawing of the same frame over and over again. No matter what ControlNet or settings I use, it refuses to actually follow the guide frames at all.
Just a heads up for anyone using mediapipe controlnet with this. Make sure you set max faces to 3. If you don't you, will find the results of the animation to be a mess because it will only produce a face map for one of the images its using in the process
Do you know any edits to the script that can be done to upload more guide frames (e.g. 2000 frames). If i upload too many guideframes, the script doesn't generate anything. I can only upload approx 80 frames
when you upload something to gradio, it creates a temporary copy of the file and works with that, see https://www.gradio.app/docs/file#behavior so maybe it's just lack of disk space on your system partition?
However, I never tried the script with that many frames. And I also wouldn't recommend it because of color degradation that WILL happen over time.
It takes a very, very long time to render with this script. If the usual generation with ControlNet takes 1 minute, then with the script, the first frame is 2 minutes, the second frame is 5 minutes, the 3rd frame is 25 minutes already, and so on. I can't wait for it to finish (res is 576/1024, 1controlnet)
ps 3060 12gb
Hey Xanthius! I did some changes to the script that I want to share with the community - are you okay with that?
find my modified script here:
https://github.com/finefin/SD-scripts
Thank you!
will test it!
Error loading script: multi_frame_render-beta-fine-version.py
File "D:\SDiff\webui\scripts\multi_frame_render-beta-fine-version.py", line 91
<title>SD-scripts/multi_frame_render-beta-fine-version.py at main · finefin/SD-scripts · GitHub</title>
^
SyntaxError: invalid character '·' (U+00B7)
How to install it properly?
Error loading script: multi_frame_render-beta-fine-version.py
Traceback (most recent call last):
File "D:\SDiff\webui\modules\scripts.py", line 257, in load_scripts
script_module = script_loading.load_module(scriptfile.path)
File "D:\SDiff\webui\modules\script_loading.py", line 11, in load_module
module_spec.loader.exec_module(module)
File "<frozen importlib._bootstrap_external>", line 879, in exec_module
File "<frozen importlib._bootstrap_external>", line 1017, in get_code
File "<frozen importlib._bootstrap_external>", line 947, in source_to_code
File "<frozen importlib._bootstrap>", line 241, in _call_with_frames_removed
File "D:\SDiff\webui\scripts\multi_frame_render-beta-fine-version.py", line 7
<!DOCTYPE html>
^
SyntaxError: invalid syntax
You downloaded the wrong thing. You need to get the raw file: https://raw.githubusercontent.com/finefin/SD-scripts/main/multi_frame_render-bet...
Thx Bro, i re download it, and it helps.
But when i'm starting generate with script nothing happens
(AttributeError: module 'modules.shared' has no attribute 'log')
What i,m doing wrong now?;))
I did not change the log output at all. Maybe you need to update your SD install? I use SD.next by Vladmandic and don't have any problems.
You could try to comment out that function call on line 69: put a "//" in front of the line like this:
// shared.log.info (....
If you do that, you wont see any progress in the UI, tho.
Hello there! I got some issues with this tool
First time when i used it - works perfectly, generate what i lookin for and all that.
But after that, it starts to generate first pic over and over again, no matter what settings i use, no matter how much pic i selected as animation, every time same results with first generated picture, only with little differences between them
Did somebody deal with that issue?
I think i fixed that by choose "Balanced" in Control mode in ControlNet. Previously ControlNet was more important
Greetings and beofre anything thanks for that much appreciated script !
From what I've read in the comments, there is a limit to the amount of images we can feed at once... I've tried the script update tips as indicated by @sxy9699 but to no avail, I still get the same error when trying to upload longer sequences (above 1000 images).
Is there anyway to get around this limitation and be able to feed it 1000's of pictures, much like in Deforum ?
I am enjoying the quality of and coherence I get with your script and that technique but I'd like to be able to throw huge sequences at it...
Thanks for your time, patience and, hopefully, help !
I use the script to try to generate a video, the first image is fine but the second image takes forever to come out. Is there a way to solve the problems? thank you!
there are many reasons why this can happen - take a look at the console output to narrow them down ;)
looks like you're running out of memory. you can try to lower the resolution, use less ControlNets and enable low vram mode.
I have seen a number of folks use your script for great result, and I am excited to use it, however I am having some challenges. I found your script from a video by Geek At Play, and he uses different settings than you do. I have tried both and still don't have satisfactory results. When I follow your instructions, using the 0 denoise for the first frame and any of the loopback settings, I get a great first frame, but the second and subsequent frames are completely different. I imagine that it has something to do with controlnet, but I'm not sure what is wrong. Any thoughts would be very helpful.
First of all make sure you select "pixel perfect" in your ControlNet(s).
I use the A1111-fork by Vlad and in some cases I have to de- and reactivate ControlNets and LoRAs after sending my first frame from txt2img. Sometimes only a complete re-start of the GUI helps. I usually do a few test renders before I activate the video script in order to see if it's working.
You should set the initial denoise to 0 if you want to keep your 1st frame, otherwise it will be re-rendered.
The normal 'denoise' setting should be something between 0.9 and 1, tho. If you set it below that you will generate garbage and if you set this to 0 you get the same frame over and over again.
Sadly, I'm just not getting there. I have explored MANY settings! Although I have had varying and interesting results, I have yet to come close to anything I want. When I in fact use denoise like you suggest of .9 to 1.0 (full on baby) I get frames that look nothing like the original except in pose. I have tried all three loopbacks and the second frame is always dog poop. I have followed your instructions to the letter and I have also followed "Geek at Play's" tutorial and my results are very different than either. I am clearly missing something very basic, but I have no clue what it is.
I would think that what I am try to accomplish should be doable: I have 489 frames of a man playing violin, I need to make him into a Lycan (wolfman) playing violin. I can test with any frame in Image to Image and get the output that I desire, But when I run the script, I get all kinds of weirdness. The strangest was when it put glasses and a gas mask on him. Nothing in the prompt, nor the guide frames that would suggest that!
Is there anything that you can think of that may solve my issues, or should I just give up and go through the longer and more arduous process of doing this in Deforum with hybrid video.
Thanks again for developing a tool that is working well for so many!
Evidently I'm a glutton for punishment! I spent several hours that I just didn't have to spend trying to get this to work, mainly because my best alternative SD-CN-Animation, is broken and therefore not an option. What is happening every time, regardless of any settings I use, is that in the second generation generation, the subject is moved to the left edge of the frame. Maybe you can help me to understand this weirdness. . . .
oh yes, I had a "move to left by half the width" issue once or twice and I don't really know why that happens. I think it was caused by the checkpoint or a LoRA that I used. And did you take a look at the console output? It sometimes gives you a hint on what is maybe missing or not working correctly.
Your script is the best for SD at the moment, thank you very much!
same problem, can you do so we can just add FOLDER name for UPLOAD? why upload 5000 files, ?? please ?
Getting "UnidentifiedImageError: cannot identify image file" error when I click the generate button. Guide frames are selected. I can see the temp image file was created but with 0kb in size. Thanks in advance!
you can fix this error by editing the python script as described here: https://itch.io/post/7576730
thanks, but not working, I find out , that i can drop images. but that is also not working , I am using google drive colab
please can you add url insted like a code? so I can add the dir of the google drive and dont upload?
oh, you're trying to run in on Collab? sorry, I can't help you with that, I only run this script locally.
@Xanthius. Good work on the script. I am working on a new AAA film and I have got a job for you. How do I get in touch?
Hey! I saw that Xanthius didn't reply to your comment for a month now and wanted to offer my expertise in this field, if you are still interested. I experiment a lot with AI stylization, so if you want to get in touch with me [aleksejfifa15@gmail.com] is my email adress.
here's another short animation that I made :)
Warning: loud noise! turn down audio volume!
You mentioned in this tutorial that you've done non faces using this technique, and I'm really interested in locking in a decent rotoscoping method using stable diffusion, hopefully one with only slight alterations/flickering. Right now I'm trying out the "loving vincent" style van gogh rotoscoping using this technique with some drone footage I took in switzerland, however I ran into several issues. When I follow these exact steps in the tutorial, it seems each frame is getting darker and darker and the lines eventually become super dark and take over the image, all of the brush work gets flattened out and it starts essentially glitching after like 10 frames.
So I tinkered around a bit and found that if I change the last setting (loopback source) and set it to "firstgen" instead of "previous frame", the issue is resolved, however it seems like its not really moving, but just kind of looping the first frame over and over again, no more darkening, it gets additive for about 10 frames and then pretty much just stays still and doesn't move with slight flickering.
My videos camera pans slightly, and that isn't being reflected when I render this. Basically I'm just trying to batch the process in a way where Stable diffusion is painting over ever frame of an image sequence, but using control net in a way where it locks in the style for subsequent frames in the sequence. Any thoughts or recommendations using your method?
Hello! Sent a few $ over yesterday and grabbed the script. Getting errors thought.... is it still being updated at all?
Dropping by just to cheer you on! I've tried the other methods (SD-CN-Animation and TemporalNet) and your script is still by far the most reliable and flexible method.
Could you make a video tutorial please? I can't seem to get how it's done due to struggles with just text descriptions.
You can check my video:
the most amazing script ever, thank you so much for this
Any word on the update to upload custom masks for the frames?
This would allow Higher resolution workflows though tiling sections together and much finer control.
Also the batch idea for the guide image would be great to help guide the animation with control net better.
fantastic script!!
I'm figuring out some workflows will update with results soon.
Still works fine with my updated a1111 :) though there seems to be a limit to how many init images I can upload.
Would you be able to update your script to work with the latest version of a1111? The one mentioned below that supports your script still didn't support AMD cards so the rendering is unbearably low. Thanks in advance!
Works great but you have to use an older webui version (git checkout a9eef1fbb1dcdce4f0eb0b8e0f79dcd4c96713e1) as described in MonsterMMORPG's video, hope this can get updated to the latest version of webui!
what would be the minimum vram for this i keep getting out of memory even when running control next on low vram, it works fine normally for like batch img2img with control net so confused why
The most up to date and detailed tutorial here. Moreover, I have shared file path instead of upload. Works on runpod as well
im not able to get this to work, i simple get the same image for the output. does anyone know a solution to this error?
allow other scripts to control this extension on controlnet
I'm getting an error. All my extensions are up to date and it's saving the images, but every image save I'm getting -
ERROR:sd_dynamic_prompts.callbacks:Error save prompt file | 20/18320 [01:21<22:37:33, 4.45s/it]
Traceback (most recent call last):
File "F:\stable-diffusion-webui\extensions\sd-dynamic-prompts\sd_dynamic_prompts\callbacks.py", line 24, in on_save
png_info = image_save_params.pnginfo["parameters"]
KeyError: 'parameters'
INFO:sd_dynamic_prompts.dynamic_prompting:Prompt matrix will create 1 images in a total of 1 batches.
Loading model from cache: control_sd15_canny [fef5e48e]
---
I do have JPG as my default save format, I changed it to PNG and still have the same error. I'm going to let it render out, it's going to be a while, When it's done I'm going to disable the dynamic_prompts and see if that does it.
Disabling dynamic_prompts removed the error.
The most up to date and detailed tutorial released. Moreover, I have shared file path instead of upload. Works on runpod as well
I see there is a new third frame option called "GuideImg". What does that do? Can you please update the docs in this page about this? thanks
GuideImg just means that it uses the Guide Image for that frame, which is the same image passed to the ControlNet
thanks!
Getting "UnidentifiedImageError: cannot identify image file" error when I click the generate button. Guide frames are selected. I can see the temp image file was created but with 0kb in size. Thanks in advance!
sxy9699 said:
I found an easy way to solve this problem: simply change the code in multi_frame_render.py
to
Thanks for this quick fix!
In case you want to upload single files instead of a whole folder change the line to this:
The script doesn't work with the current version of Automatic 1111 web UI. After checkout an old version of web UI, it works well. For more details, you can watch the video bellow posted by MonsterMMORPG, start from 13:53.
Hi Xanthius! Love your work here - I'm the founder of https://kaiber.ai - a generative AI video platform. We recently worked on Linkin Park's LOST music video - was wondering if you were interested in consulting/contract work. Drop me a line at eric@kaiber.ai if so!
The most up to date and detailed tutorial released
Thanks!
Ah yes, it works finally! thanks again for the the code tweak!
I would have never figured out how to fix this by myself!
I've been using the classic batch img to img and it gave excellent results already but I can't wait to see and share what I can get from Xanthius's script!
Great tutorial! Do you know how this would work with Google Colab? I'm very new to this and haven't found a way to roll back to the earlier commit. I'm also getting the "UnidentifiedImageError" with the latest version.
Thanks!
Dear developer please add folder path option instead of upload.
With new update script doesn't work anymore, keep reciving this error:
UnidentifiedImageError: cannot identify image file 'C:\\Users\\Username\\AppData\\Local\\Temp\\out-00008lqje9jfr.png'
Same error, I decided to assemble a 1500€ PC because this script's results looked so good (when it works). I even tried to modify the line of code associated with the error in order to remove the "8lqje9jfr" by replacing the 77th line of code by this:
p.control_net_input_image = Image.open(reference_imgs[i].name.replace("\\\\", "\\")[:-12] + reference_imgs[i].name.replace("\\\\", "\\")[-4:]).convert("RGB").resize((initial_width, p.height), Image.ANTIALIAS)
but that's not it.
Tried different image sequence renderers as I thought the images where faulty, I doubt it is.
Tried jpeg, png, not it.
I tried with and without controlnet still no.
Maybe it was the resolution I made sure it all matched, not it.
I will use the standard control net for animation for now until it's solved.
I am making a tutorial video right now for this script. I made it work easy but not with latest automatic1111. the biggest problem of the script that it is uploading instead of directory. working on that too
it will be on my channel https://www.youtube.com/@SECourses
Keep us posted! until then, I'm not giving up.
I'm stilll trying to understand what is happening. I stupidly thought that these kind of files "'C:\\Users\\Username\\AppData\\Local\\Temp\\out-00008lqje9jfr.png'" were basically our guiding frames, but evidently not. It's not even in the same directory.
When I look at the properties of said file, it's actually an empty file, it says: 0byte file size... that might be why it's unidentified.
here tutorial released
here a tutorial
here tutorial released :
I found an easy way to solve this problem: simply change the code in multi_frame_render.py
to
like this:
it works for me!
thanks a lot! It worked.
Same same
take a look at the console output, it will give you a hint. For me it mostly fails because of memory issues. In that case use less ControlNets and/or enable the Low Vram mode.
I think it's a really great work but I have a problem after trying it. I use recommandation settings to render my frames, then the frame2 and frame3 have a bad color degradation compared with frame1, even if they are same pictures. Fortunately after frame3 there is no longer color degradation. It makes the step1 style transfer become no use, is this an unfixed bug?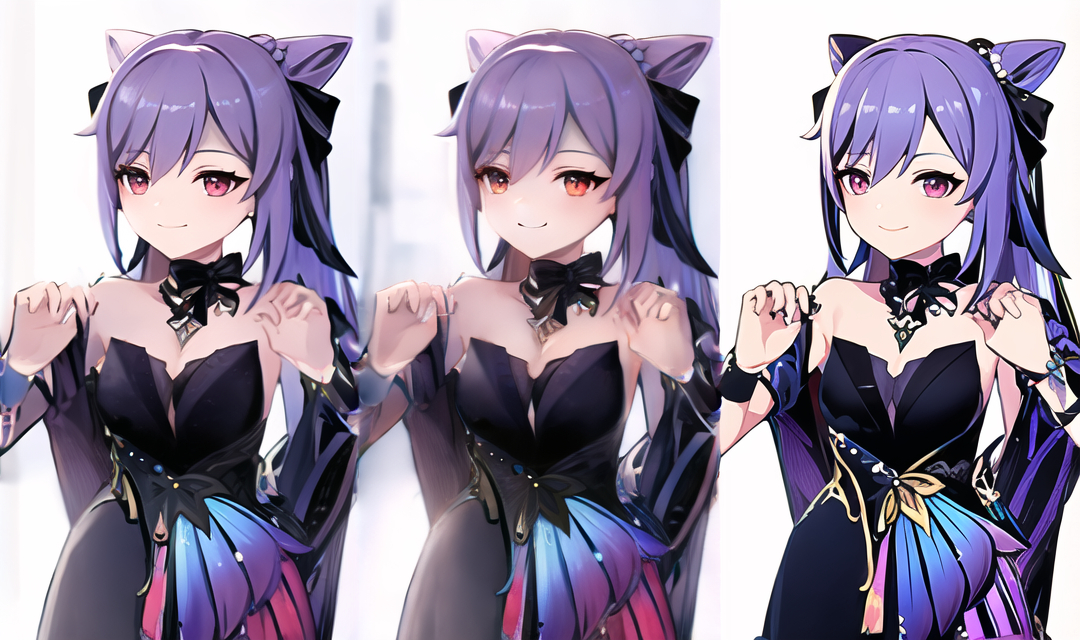
Hello,
Is there a different way to tip you? I don't use PayPal.
Thanks!
I appreciate the desire to tip but unfortunately Paypal is the only thing I have setup that can accept tips like that (unless you deal with crypto or something where I could make a keypair quickly). No need to concern yourself with tipping me though. People have been more generous than I expected already (especially the people that came here after the PromptMuse video dropped)
Well, except a sincere thank you and a virtual high-five then 🤚
Glad to hear others have been generous
what category to put the plug-in in, i use the web version of StableDiffusion